When the toyota 4runner seat heater switch fails, the entire heated seat system goes dark — no warmth, no indicator light, sometimes no response at all.
This 2026 repair guide covers how the switch functions inside Toyota’s seat heating circuit, how to confirm the switch is the true failure point rather than a fuse, relay, or element, and how to replace it correctly on third- through fifth-generation 4Runners spanning the N180, N210, and N280 platforms.
How the Toyota 4Runner Seat Heater System Works
The seat heating system in a 4Runner consists of three core components:
- a resistive element woven into the seat cushion and backrest foam
- a temperature-limiting circuit
- the switch used to control it from the driver’s position. When you activate the switch
- a signal travels to the Body Control Module (BCM) on fourth- and fifth-generation models
- third-generation trucks use a simpler relay-direct circuit without BCM involvement
- which also makes them easier to diagnose.
Current flows from the fuse block through a dedicated relay, through the carbon-fiber or stainless-steel heating element, and back to chassis ground. Most 4Runner trims offer two heat levels — Low and High — selected by pressing the switch one or two times.
High output typically runs between 70 and 100 watts per seat zone; Low drops to 35–55 watts. A thermistor embedded near the heating element monitors surface temperature; once it approaches 45 °C (113 °F), the control circuit de-energizes automatically to prevent thermal injury to the occupant.
Common Symptoms of a Failing Seat Heater Switch
Identifying switch failure early prevents you from chasing wiring faults or replacing an intact heating element. Watch for these warning signs:
- No heat at any level: Pressing the switch produces no indicator light and no warmth, even after confirming the seat heater fuse is intact and unblown.
- Stuck on a single heat level: The switch cycles between positions but only one level activates, pointing to a failed internal contact or damaged position-detection circuit.
- Intermittent operation: Heat works on cold mornings but cuts out after a few minutes — a classic sign of a cracked solder joint inside the switch body that opens under thermal cycling.
- Dead indicator light: The amber or blue LED is dark while the element still produces heat, meaning the LED or its current-limiting resistor inside the switch has burned out independently.
- Physically damaged rocker: The switch face has cracked or separated from the housing due to UV exposure or repeated force, preventing full actuation or allowing moisture ingress that corrodes internal contacts.
Before condemning the switch, check the seat heater fuse in the interior fuse block — typically 15 A or 20 A, labeled SEAT HTR — and swap the relay with an identical relay from another position in the same block.
Eliminating those two upstream components takes under five minutes and prevents an unnecessary switch purchase.
Diagnosing the Seat Heater Switch Step by Step
A systematic approach isolates the switch from the rest of the circuit in under 30 minutes using only a multimeter and basic hand tools.
- Step 1 — Confirm fuse continuity: Pull the seat heater fuse and test across both terminals with a multimeter set to continuity mode. A blown fuse reads OL regardless of switch condition and must be replaced before any further testing.
- Step 2 — Test relay function: Swap the seat heater relay with a known-good relay of the same part number from another fuse block position. Restore the fuse and test the seat. If the seat heats after the swap, the relay was the faulty component.
- Step 3 — Verify switch supply voltage:
- With the ignition in the ON position
- backprobe the switch connector using a T-pin or thin multimeter probe tip. The supply pin should read battery voltage (12.0–14.4 V)
- the ground pin should read 0 V. Consult the Toyota Electrical Wiring Diagram (EWD) for your specific model year to identify correct pin assignments before probing.
- Step 4 — Check switch output state:
- While backprobing
- press the switch through each position and observe the output pin. The output voltage should change state when the switch is pressed. If supply voltage and ground are both confirmed present but the output pin shows no change across positions
- the switch has failed internally.
- Step 5 — Measure element resistance: Disconnect the seat harness connector under the cushion and measure resistance across the element terminals. A healthy 4Runner front seat cushion element reads 2–4 Ω. An open-circuit reading (OL) means the element wire has broken, not the switch, and points to a different repair path entirely.
Switch Types and Generation Compatibility
Toyota changed the seat heater switch design across 4Runner production history. Installing the wrong generation part causes connector mismatch, missing indicator function, or active diagnostic trouble codes that prevent the system from enabling.
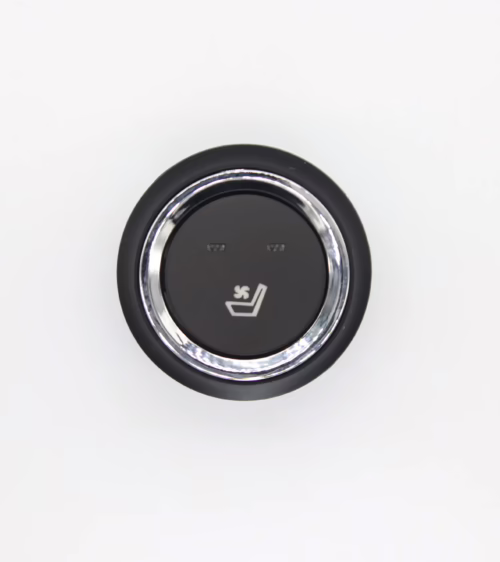
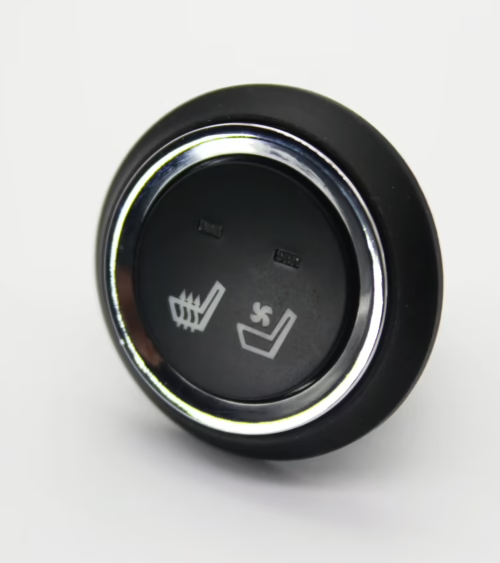
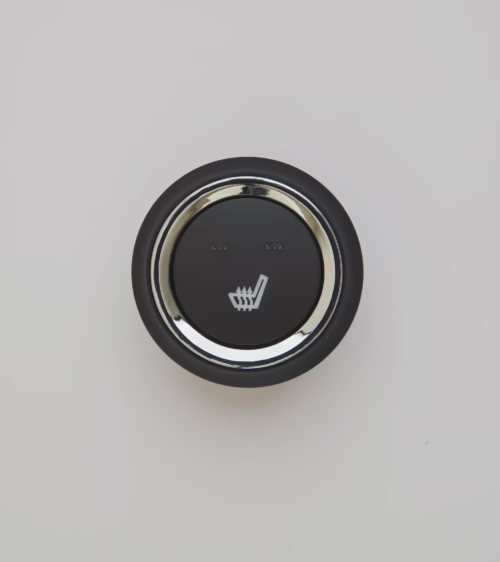
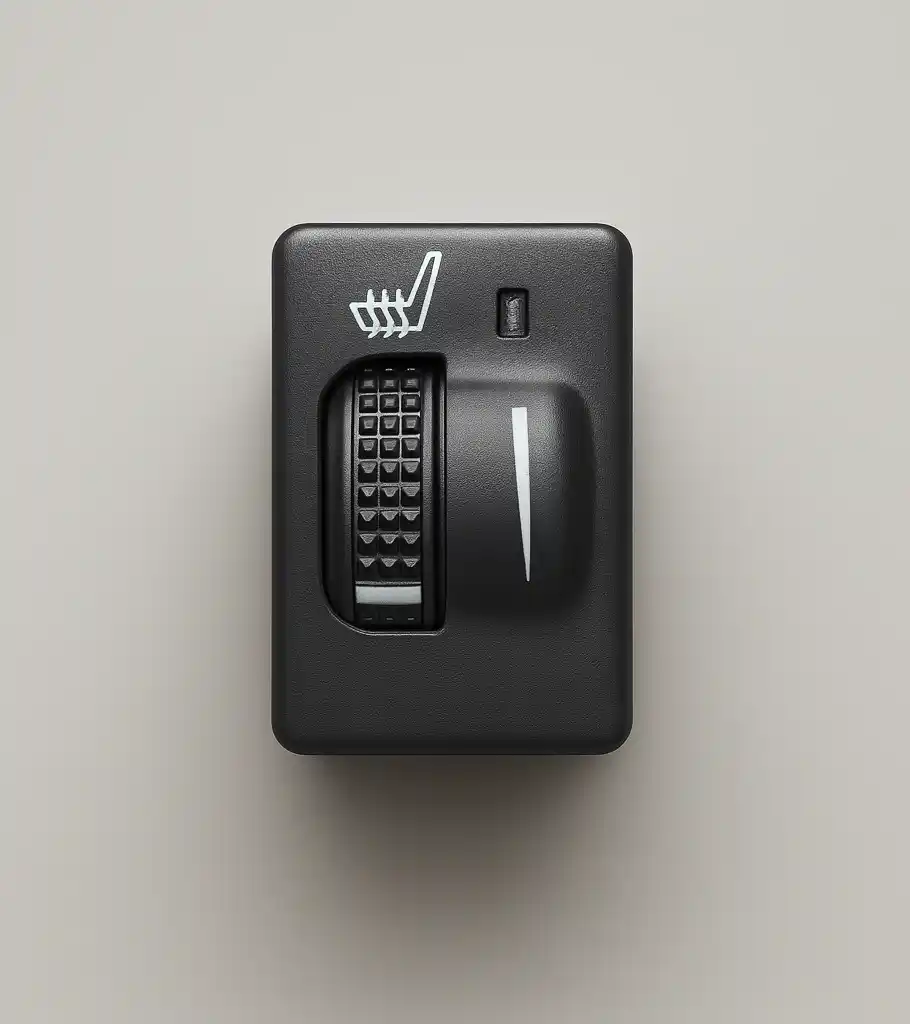
- Third Generation (N180, 1996–2002): Two-pin SPDT rocker with no LED and no BCM integration. Used exclusively on SR5 and Limited trims that included the factory heated seat option. A direct-replacement rocker with the same connector footprint is all that is required.
- Fourth Generation (N210, 2003–2009): Three-position momentary switch with an integrated amber LED and a three-pin connector. The BCM monitors switch state on these trucks, so aftermarket units must match connector pitch and LED polarity exactly to avoid indicator malfunction.
- Fifth Generation (N280, 2010–2024): Multi-function switch cluster with dual-zone control on Limited and TRD Pro trims. The switch communicates through the vehicle’s controller area network (CAN bus); only OEM-equivalent or CAN-compatible units avoid persistent DTCs and ensure both heat levels operate correctly.
Always cross-reference the Toyota part number stamped on the original switch body before ordering a replacement. If you are sourcing aftermarket units, browse our seat heater switch catalog to filter verified fitment options by 4Runner generation and trim level, with connector diagrams included for each listing.
How to Replace the Seat Heater Switch
Replacement takes 20–40 minutes on third- and fourth-generation models and up to an hour on fifth-generation trucks with integrated console switch clusters. You will need a plastic trim pry tool, a Phillips #2 screwdriver, a 10 mm socket, and electrical contact cleaner.
- Step 1: Disconnect the negative battery terminal and wait 90 seconds for airbag system capacitors to discharge before touching any dash or console component.
- Step 2: Insert the plastic pry tool at the clip locations on the switch trim surround — typically two clips at the bottom edge and one on each side — and release each clip gently in sequence.
- Work around the perimeter rather than prying at a single point to avoid cracking the panel.
- Step 3: With the trim panel free, press the two retention tabs on the sides of the switch housing inward simultaneously and push the switch rearward through the opening. On N280 consoles, a single 10 mm bolt secures the switch carrier bracket before the tabs can release.
- Step 4: Depress the connector locking tab and pull the harness connector straight off the switch pins. Never twist the connector; this stresses the terminal crimps and can break the alignment post inside the housing.
- Step 5: Spray the new switch’s connector terminals lightly with electrical contact cleaner and allow 60 seconds to dry. Connect the harness to the new switch, push the switch into the panel opening until both retention tabs click audibly, and reinstall the trim surround.
- Step 6: Reconnect the battery, turn the ignition to ON, and test both heat levels before finalizing the installation. Confirm the indicator illuminates correctly at each position and that the BCM (on N210 and N280 models) does not log a new fault code.
Wiring and Electrical Considerations
Toyota’s seat heater circuits use 14 AWG wire from the fuse block to the relay and 16 AWG from the relay to the heating element. This gauge selection keeps voltage drop under 0.5 V across the full circuit length during a 6–8 A heating load.
If your replacement switch tests correctly on the bench but the seat still does not heat after installation, measure voltage at the element harness connector with the switch activated.
Any reading below 11.5 V under load indicates resistance elsewhere — common causes are corroded ground straps under the seat rail bracket or oxidized contacts inside the relay socket.
On fifth-generation 4Runners with dual-zone climate seats, the driver and passenger heating elements share a common ground splice located behind the B-pillar lower trim panel.
Corrosion at this splice causes both seats to fail at the same time, a symptom that is frequently misdiagnosed as a BCM or dual-switch fault. Clean the splice connector with electrical contact cleaner, apply dielectric grease to the terminal faces, and retest before ordering any control components.
If you are retrofitting heated seats into a third-generation N180 that left the factory without the option, you will need the cushion and backrest heating elements, a relay, new wiring from the fuse block, and a compatible two-pin switch.
You can browse our full seat heating product lineup to source complete retrofit kits — including elements, harness adapters, and switches — designed and tested for Toyota applications.
Frequently Asked Questions
How long does a Toyota 4Runner seat heater switch typically last?
Most OEM switches are rated for 150,000–200,000 actuations, translating to roughly 10–15 years of daily operation under normal conditions.
Wear accelerates when switches are pressed repeatedly with wet gloves or when moisture enters through a cracked rocker face and corrodes the internal contact plates. Driver’s side switches fail sooner than passenger switches in nearly all cases due to higher daily use frequency.
Will a universal aftermarket switch work on my 4Runner?
A generic two-pin rocker is electrically compatible with third-generation N180 models, where the circuit is a simple relay-direct loop with no BCM monitoring. Fourth- and fifth-generation 4Runners require a switch that matches the OEM connector pinout exactly, including LED polarity.
Fifth-generation N280 trucks additionally require CAN bus compatibility; installing a universal switch on this platform keeps the heated seat DTC active and may prevent the system from enabling at all, even if the switch physically fits the opening.
Can I test the seat heater switch without removing it from the dash?
Yes. With the ignition in the ON position, backprobe the switch connector using a T-pin inserted alongside the terminal without disconnecting the harness.
Monitor the output signal pin with your multimeter while pressing the switch through each position.
If battery supply voltage and a solid ground are confirmed present at the connector but the output pin shows no voltage change across switch positions, the switch has failed internally and the diagnosis is complete without any disassembly beyond panel removal for probe access.
Lucky Driver Inc. supplies OEM-grade seat heating components engineered specifically for Toyota 4Runner applications, from individual control switches to complete heating element and wiring retrofit kits.
Whether you are replacing a failed unit on a high-mileage fifth-generation N280 or building out a full heated seat installation on an early N180, our technical team can verify compatibility for your exact trim level and ship the correct parts directly to your door. Contact Lucky Driver Inc.
today and have your 4Runner’s heated seats performing reliably before the next cold season arrives.
Related Articles
- Toyota Corolla Heated Seats: 2026 Complete Owner’s Guide
- Toyota Highlander Seat Heater Switch: 2026 Repair Guide
- Seat Heater Guide: How They Work, Types, and Buying Advice
- Toyota Tacoma Heated Seat Switch: Diagnosis and Replacement
- Heated Seat Rocker Switch: Wiring, Types, and Selection Guide
Frequently Asked Questions About toyota 4runner seat heater switch
Procurement engineers evaluating toyota 4runner seat heater switch for OEM programs regularly ask the following questions. Answers cover specification, compatibility, certification, and sourcing for toyota 4runner seat heater switch requirements.
What voltage ratings are available for toyota 4runner seat heater switch?
Standard toyota 4runner seat heater switch configurations support 12 V DC for passenger vehicles and 24 V DC for commercial trucks. Selecting the correct toyota 4runner seat heater switch voltage at the design stage eliminates harness rework later.
Lucky Driver maintains toyota 4runner seat heater switch inventory in both ratings for same-week shipment.
Which certifications apply to toyota 4runner seat heater switch production?
toyota 4runner seat heater switch assemblies entering OEM programs typically require UL recognition, REACH compliance, and RoHS documentation. Lucky Driver holds certification records for every toyota 4runner seat heater switch variant and includes copies with sample and production shipments.
How is watt density specified for toyota 4runner seat heater switch?
Watt density for toyota 4runner seat heater switch is expressed in W/cm² and ranges from 0.04 to 0.12 depending on heat-up time requirements. Lower watt density toyota 4runner seat heater switch designs improve element longevity, while higher values suit cold-climate applications.
Lucky Driver engineering reviews toyota 4runner seat heater switch requirements and recommends watt density based on your seat platform.
What connector families are used with toyota 4runner seat heater switch?
toyota 4runner seat heater switch harnesses are available with Molex, TE Connectivity, and Delphi connector families. Matching the toyota 4runner seat heater switch connector to the vehicle harness reduces assembly time and eliminates adapter cables.
Specify your harness format when requesting a toyota 4runner seat heater switch quote from Lucky Driver.
What is the lead time for toyota 4runner seat heater switch samples?
toyota 4runner seat heater switch samples from Lucky Driver’s North American warehouse ship within 3 to 5 business days for standard configurations. Custom toyota 4runner seat heater switch variants with modified pad geometry or connector pinouts require 4 to 6 weeks.
Contact Lucky Driver to confirm toyota 4runner seat heater switch availability before submitting your engineering schedule.